

In today’s digital world, knowing how to properly address an envelope remains an essential skill. Whether you’re sending a business letter, a wedding invitation, or a personal note, the way you fill out an envelope affects both its delivery success and the impression it makes. A well-addressed envelope demonstrates attention to detail and professionalism, while incorrect formatting can lead to delivery delays or even lost mail. This comprehensive guide will walk you through everything you need to know about addressing envelopes clearly and professionally for any situation.
Basic Steps to Fill Out an Envelope
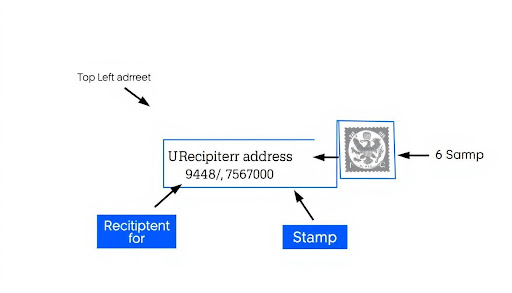
Properly addressing an envelope involves more than just writing down a name and address. Following the correct format ensures your mail gets delivered efficiently and makes a good impression on the recipient.
The Return Address: What Goes in the Top Left Corner
The return address is your address as the sender, placed in the top left corner of the envelope. And it ensures that if the mail cannot be delivered, it will be returned to you.
- Write your full name on the first line
- Add your complete street address on the second line (include apartment or suite numbers)
- Write your city, state, and ZIP code on the third line
- And use clear, legible handwriting or printed labels
The USPS recommends using all capital letters with no punctuation for machine readability, though this is less critical for the return address than for the recipient’s address.
The Recipient’s Address: Center Placement
And the recipient’s address should be placed in the center of the envelope, slightly below the middle. This is the most important part of your envelope as it determines where your mail will be delivered.
- And firstly write the recipient’s full name on the first line
- Add their complete street address on the second line
- Then it includes the city, state, and ZIP code on the third line
- For optimal processing, use all capital letters with no punctuation
- Align the address to the left, even though it’s centered on the envelope
Postage: The Top Right Corner
Proper postage is essential for mail delivery. Place your stamp in the top right corner of the envelope, making sure it’s straight and firmly attached.
- For standard letters (1 oz or less), use one Forever stamp
- For heavier letters, add additional postage as needed
- Leave space around the stamp for postal markings
- Avoid placing the stamp too close to the edge of the envelope
Know about How to Address a Business Envelope
Business correspondence requires additional formality and specific formatting to ensure it reaches the correct person within an organization.
Addressing a Business Envelope with a Specific Recipient
When you know the name of the person you’re sending mail to within a company, include both their sender name and the company name.
Firstly write the recipient’s full name on the first line
Add the company name on the second line
Include the street address and suite number on the third line
Finish with the city, state, and ZIP code
| Line | Information | Example |
| Line 1 | Recipient’s Name | MS. SARAH JOHNSON |
| Line 2 | Company Name | ACME CORPORATION |
| Line 3 | Street Address & Suite | 555 BUSINESS PLAZA STE 200 |
| Line 4 | City, State, ZIP | NEW YORK NY 10001 |
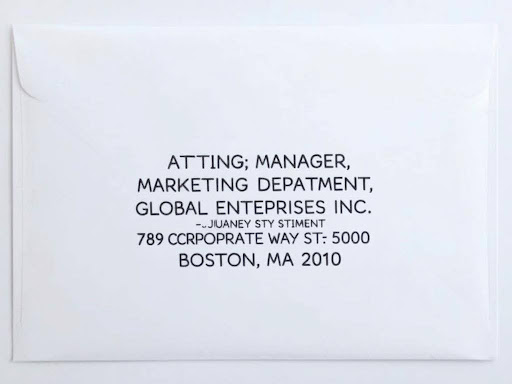
How to Address a Business Envelope Without a Name
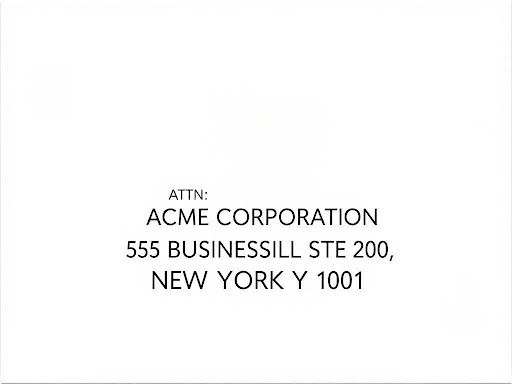
When you don’t know the specific recipient, you can address the envelope to a department or position title.
Use “ATTN:” (short for “Attention”) followed by the department or position
Add the company name on the next line
Include the complete address as usual
Using “ATTN:” helps route your mail to the appropriate department even when you don’t have a specific person’s name.
| Line | Information | Example |
| Line 1 | Department/Position | ATTN: HUMAN RESOURCES |
| Line 2 | Company Name | ACME CORPORATION |
| Line 3 | Street Address & Suite | 555 BUSINESS PLAZA STE 200 |
| Line 4 | City, State, ZIP | NEW YORK NY 10001 |
Special Cases in Envelope Addressing
Beyond standard personal and business mail, there are several special situations that require specific formatting approaches.
How to Address Large Envelopes (9×12 or Oversized)
Large envelopes follow the same basic format as standard envelopes, but with a few important considerations:
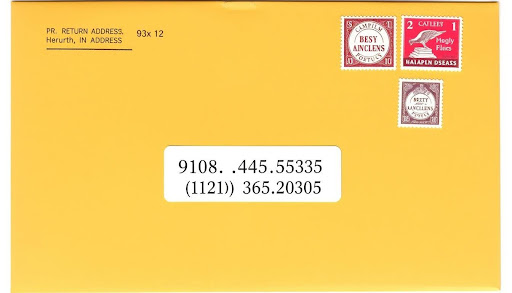
Write addresses in the same positions as on standard envelopes
Use larger, clearer writing or larger labels to match the envelope size
Ensure sufficient postage (large envelopes require more postage than standard letters)
Consider adding “DO NOT BEND” if the contents are sensitive
Understanding about How to Address an Envelope to a PO Box
When mailing to a PO Box, the format is slightly different from a standard street address:
Start with first write the recipient’s name on the first line
Write “PO BOX” followed by the box number on the second line
For include the city, state, and ZIP code on the third line
Do not include a street address when mailing to a PO Box
| Line | Information | Example |
| Line 1 | Recipient’s Name | ROBERT MILLER |
| Line 2 | PO Box Number | PO BOX 5678 |
| Line 3 | City, State, ZIP | DENVER CO 80201 |
How to Format Addresses for Job Applications
Job application envelopes should be particularly professional and precise, as they contribute to your first impression.
- Use high-quality envelopes in standard business size
- Address to a specific person if possible, or to “HIRING MANAGER” or the specific department
- Include “RE: [Position Title]” below the recipient’s name if appropriate
- Use printed labels or extremely neat handwriting
- Include a professional return address with your full name
- For job applications, consider using delivery confirmation or tracking to ensure your materials arrive safely and on time.
Postage Guidelines: How Many Stamps Do I Need?
Correct postage is crucial for successful mail delivery. The amount of postage required depends on several factors including weight, size, destination, and service class.

Standard Letters vs. Large Envelopes
The USPS classifies mail into different categories, each with different postage requirements:
| Mail Type | Weight Limit | Size Specifications | Stamps Needed (2023 Rates) |
| Standard Letter | Up to 1 oz | Max: 6⅛” x 11½” x ¼” | 1 Forever stamp |
| Standard Letter | 1-2 oz | Max: 6⅛” x 11½” x ¼” | Additional postage required |
| Large Envelope (Flat) | Up to 1 oz | Max: 12″ x 15″ x ¾” | 2 Forever stamps (approximately) |
| 9×12 Envelope | Up to 1 oz | 9″ x 12″ | 2-3 Forever stamps (check current rates) |
For precise postage calculations, especially for heavier items or special services, visit your local post office or use its USPS Postage Calculator online.
Some Key Factors Affecting Postage Costs
There are several factors can influence how much postage you’ll need:
Weight
Heavier mail requires more postage. Consider investing in a small postal scale for accuracy.
Size
Oversized or non-standard shaped envelopes typically require additional postage.
Destination
International mail and certain domestic zones may have higher rates.
Special Services
Tracking, insurance, certified mail, or priority services will add to the base postage cost.
Major Common Mistakes & Pro Tips
Even small errors in addressing can lead to delivery problems. Here are common mistakes to avoid and professional tips to ensure your mail looks polished and gets delivered promptly.
And some Common Mistakes to Avoid
- Using smudge-prone pens or markers
- Writing too small or with illegible handwriting
- Placing the return address on the back flap (can be missed by automated sorting)
- Forgetting the ZIP code or using incorrect abbreviations
- Placing addresses too close to the edges of the envelope
- Using punctuation marks in the address (commas, periods)
- Incorrect placement of apartment or suite numbers
Pro Tips for Perfect Addressing
- Use blue or black ink that won’t smudge
- Write in all capital letters for better readability
- Use printed labels for the most professional appearance
- Include all address elements in the proper order
- Verify addresses before writing them
- Leave space at the bottom of the envelope for postal barcodes
- Consider using address templates for perfect alignment
Firstly Handwriting vs. Printed Labels
Both handwritten addresses and printed labels have their place, depending on the context:
Handwritten Addresses
- Best for personal correspondence and invitations
- It adds a personal touch for special occasions
- For use a ruler to keep lines straight
- Print clearly in all caps for best readability
Printed Labels
- And it is ideal for business correspondence
- Perfect for job applications and formal documents
- Ensures consistent formatting and perfect legibility
- For time-saving for bulk mailings
International Mailing Considerations
When sending mail internationally, there are additional formatting requirements and considerations to ensure your mail reaches its destination.
- Write “INTERNATIONAL” at the top of the envelope
- Include the recipient’s country name in ALL CAPS on the last line
- Use the country’s postal code format (which may differ from US ZIP codes)
- Write the recipient’s name and address in the destination country’s format when possible
- Include your country (USA) in your return address
- Use Roman characters (English alphabet) even when sending to countries with different writing systems
International mail typically requires more postage than domestic mail. Check with your post office or the USPS website for current international rates.
Conclusion: Mastering the Art of Envelope Addressing
Properly addressing an envelope is a simple skill that makes a significant difference in both mail delivery success and the impression you make. By following the guidelines in this article, you can ensure your mail reaches its destination efficiently while presenting yourself professionally.
Always include a complete return address in the top left corner
And place the recipient’s address in the center of the envelope
Use appropriate formatting for special cases like business mail, PO boxes, or international destinations
Ensure sufficient postage based on the envelope’s size, weight, and destination
Consider the context when choosing between handwritten addresses and printed labels
Whether you’re sending a business proposal, a wedding invitation, or a simple thank-you note, taking the time to address your envelope correctly demonstrates attention to detail and ensures your message reaches its intended recipient.
FAQs
What is the correct way to fill out an envelope?
The correct way to fill out an envelope includes placing your return address in the top left corner, the recipient’s address in the center, and postage in the top right corner. Use all capital letters with no punctuation for best readability by postal scanning equipment.
How do I address an envelope for a job application?
For job applications, use a professional-looking envelope and address it to the specific hiring manager if possible. If you don’t have a name, use “ATTN: HIRING MANAGER” or the department name. Consider adding “RE: [Position Title]” below the recipient’s name. Use printed labels or very neat handwriting, and include your full name in the return address.
How many stamps do I need for a large envelope?
Large envelopes (9×12 or similar) typically require 2-3 Forever stamps, depending on weight. For precise postage, have your envelope weighed at the post office or use a postal scale at home. The USPS website also offers a postage calculator for determining exact requirements based on size, weight, and destination.
What do you put in the corner of an envelope?
In the top left corner, place your return address. In the top right corner, place your postage stamps. If needed, you can also add special handling instructions like “FRAGILE” or “DO NOT BEND” in the bottom left corner or center of the envelope.
Leave a Reply